conda 使用方法
设置国内源加速
vim .conda/.condarc

———————————————

channels:
  - defaults
show_channel_urls: true
default_channels:
  - https://mirrors.tuna.tsinghua.edu.cn/anaconda/pkgs/main
  - https://mirrors.tuna.tsinghua.edu.cn/anaconda/pkgs/r
  - https://mirrors.tuna.tsinghua.edu.cn/anaconda/pkgs/msys2
custom_channels:
  conda-forge: https://mirrors.tuna.tsinghua.edu.cn/anaconda/cloud
  msys2: https://mirrors.tuna.tsinghua.edu.cn/anaconda/cloud
  bioconda: https://mirrors.tuna.tsinghua.edu.cn/anaconda/cloud
  menpo: https://mirrors.tuna.tsinghua.edu.cn/anaconda/cloud
  pytorch: https://mirrors.tuna.tsinghua.edu.cn/anaconda/cloud
  pytorch-lts: https://mirrors.tuna.tsinghua.edu.cn/anaconda/cloud
  simpleitk: https://mirrors.tuna.tsinghua.edu.cn/anaconda/cloud
  deepmodeling: https://mirrors.tuna.tsinghua.edu.cn/anaconda/cloud/

———————————————

conda info #检查一下是否换成国内源了
加载conda 软件变量(可以加在普通用户的.bashrc下,以后可以自动加载)
source /data/software/anaconda3/etc/profile.d/conda.sh
创建虚拟环境
conda create -n test (test 为环境变量名称)
激活使用虚拟环境
#查看当前有什么虚拟环境
conda info --envs

conda activate test  #激活conda虚拟环境 test
source activate test #激活conda虚拟环境 test
4.在虚拟环境中,安装软件
(test) [htest@master ~]$ conda install pytorch
(test) [htest@master ~]$ conda install pytorch torchvision torchaudio pytorch-cuda=11.7 -c pytorch -c nvidia
提交作业
因为这是集群模式,我们每次都是登录到登录节点,想运行GPU作业,需要作业提交。
提交作业模版
#!/bin/bash
#SBATCH -J test       ##定义作业名为test
#SBATCH -p ALL        ##指定分区,不用动集群默认就为ALL
#SBATCH -o %i.out     ##定义输出日志
#SBATCH -e %i.err     ##定义错误输出日志
#SBATCH --ntasks-per-node=1
#SBATCH --cpus-per-task=12
#SBATCH --gres=gpu:2  ##定义这个作业使用为2块卡

source activate test   ##test 是你上面创建的虚拟环境name

python -c 'import tensorflow as tf; \
       print(tf.__version_-); \
       print(tf.test.is_gpu_available());'
提交作业
将上面的脚本命名为test.sh
sbatch test.sh
注意事项
master为登录节点,上面是不带任何GPU卡的。如果你安装的pytorch-gpu或者,你运行程序是无法找到GPU卡的。所以你需要提交作业。如果想验证gpu卡
srun --gres=gpu:1 nvidia-smi #这样你就能看到gpu计算节点的卡
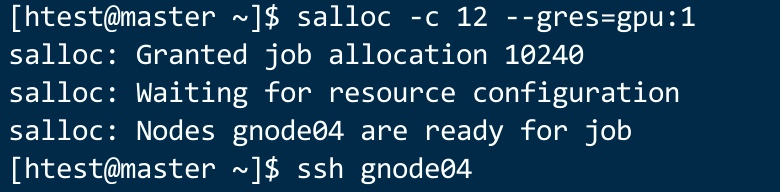
交互式作业会话
当然,如果你并不是熟悉写脚本提交作业,只想在终端里面运行程序,那么也是可以的。
salloc -c 12 --gres=gpu:1
# 这里表示我申请了一个12核心,1块gpu卡的终端会话。这个任务会在你退出终端后进行销毁。